|
|
|||||||||||||||||||||||||||
|
Do It Yourself By: Dan Launderville We thought it might be of interest to visitors of our website to get a “behind the scenes” look at what goes on at Hoffman Auto Racing.
Hoffman Auto Racing has always been known for building and modifying their racing parts. It is done both out of necessity (cost savings) and a sense of achievement. Recently a friend of ours, Steve Parcell, showed us how to lay up carbon fiber parts. He also loaned us his vacuum pump. What prompted our initial interest was a carbon fiber mount that integrated the tachometer, MSD box, and kill switch into one unit. This mount can be Dzus fastened to the car. This lightweight appurtenance would make their removal and replacement more convenient when cleaning the car. They are available commercially but are very costly. Surely, we thought, we could produce the parts at a much lower cost since our labor is cheap. Thus began our first adventure. Dan Launderville made up a mold out of aluminum and produced five of the carbon fiber MSD mounts. Dan is always looking for ways to eliminate weight on the cars. He got the idea of making our spark plug protectors out of carbon fiber instead of aluminum. We use these shields on dirt to protect the spark plugs from getting broken due to flying debris.
With success in hand with the previously mentioned parts we embarked on a more difficult task. The new task being a carbon fiber windscreen, for use on high speed pavement tracks where the drivers are buffeted quite a bit from the wind. We built the wind screen based off of an aluminum part that Rob Hoffman built for Dave Steele last season. Dan and William Friemuth built a hot wire with a 32” throat
to cut the foam that would be used to make the male plug. They constructed the hot wire frame out of
2x4 boards. The construction allows the
wire to be tilted. Tilting the wire
allows us to make parts such as the wind screen that are on angles. We used our Lincoln Electric TIG welder as a
power source since the welder will operate as low as 2 amps. Using the welder also allows us to use the TIG
machine’s pedal to vary the current. While
somewhat crude the hot wire was extremely effective. We used the hot wire to cut the entire male plug.
We used foam to construct the male plug. The foam we used was left over from one of Tom Hoffman’s palatial estates that he was building at that time. We glued several pieces of foam together to get the correct starting dimensions for the part. Once we had the basic dimensions for the wind screen we completely covered the foam with Bondo. We ran into trouble when we did not coat the foam with primer or tape. With no barrier between the Bondo and the foam allowed the Bondo to attack the foam, which it did. In some areas the Bondo literally melted into the foam. The other trouble we had was, well its foam. The foam compresses really easy, and if one were to get too firm of a grip on the part there will be impressions left in the foam. Those impressions then needed to be filled with Bondo and sanded. Richard Hoffman and Dan spent many hours sanding, filling, sanding, filling, applying primer, sanding, and filling, and sanding some more. When we finally got the male plug to a condition with which we were happy, we painted it and then moved on to the next step which is building the female mold. This is the male plug after we made the female mold off of
it. Rob put a great paint job on the plug (Richard was in
We borrowed a gel coat gun from our friend John Mugavin. We used it to spray the gel coat onto the male plug prior to Rob and Dan laying the fiberglass for the female mold. John was also our technical support for the mold making process. After separating the female fiberglass mold from the male plug, we then sanded, buffed, polished, and waxed the female mold.
Richard and Dan then laid up two layers of carbon and vacuumed it down.
After letting the epoxy resin cure for a couple of hours we removed the bagging material and put in our reinforcements.
Richard and Dan then covered the reinforcement with 3 more layers of carbon. They then vacuum bagged the part one last time.
We let the part sit in the mold over night and removed it from the female mold the next morning. As you can see this did not go as planned. We actually pulled off some of the Gel coat from the mold. After lots of careful chipping, sanding, and buffing, Dan got the Gel coat off. He then was able to trim the rough edges off the part and mount it to the car.
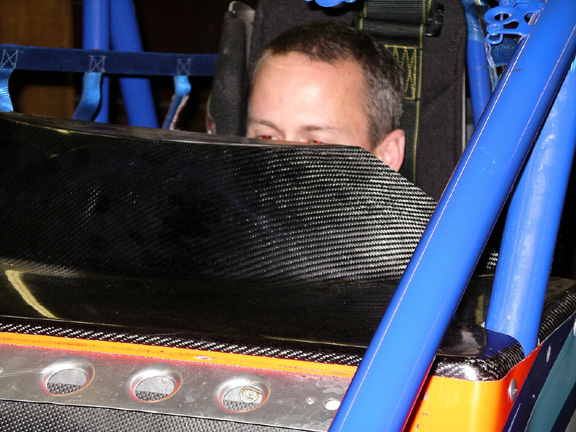
Jerry then came down and put a seat in the car and we fitted the wind screen. As you can see we need to hire taller drivers! This is Jerry complaining that he would not be able to see. We reassured him that we would tell him how to drive. We also assured Jerry that we would tell him when to turn left via the radio.
We knew when we built the wind screen that it would only be about 1-2” tall when finished. Jerry and Dan went to work cutting the cowl down to the proper height. All to please the driver, it’s all about the driver.
We hope you enjoyed this behind the scenes look at one of the many projects we undertake at Hoffman Auto Racing. Check back often as we are planning to write an article covering our sprint car starter that we built last season. |
|||||||||||||||||||||||||||
Copyright 2008 Hoffman Auto Racing |


